Wednesday, November 7, 2012

Decisions.. Decisions...

I've been working when possible to get the boat completely stripped of fiberglass and bubbly varnish so I can get a full sense of what is needed.  Trying to find time to work has been tough, and most of my free time, from 9pm to 11pm each night, has been taken up trying to finish a paddleboard that is taking up space in the garage (only a few more coats of epoxy, then varnish and its done).

But on the Snipe,  I'm nowhere close to being finished with the "demolition", but I'm far enough that I've learned a lot about the boat and its condition, and accumulated a lot of questions.  Unfortunately, I don't have any pictures, but its been a while since my last post, so I'll trudge forward and will post more photos in the next installment.  Now on to the things I think I've learned.

Stripping (3 ways)
No, not that kind, this is the varnish and fiberglass type.  the interior of the boat was varnished, and I think its pretty vintage, the entire thing is bubbling inside.  The deck was in much better shape, although most of the caulking is a mix of original caulk intermingled with modern latex stuff.  So I believe that the deck was varnished about 5-10 years ago without a complete job of re-caulking.  Most of the varnish was in decent shape, but I've decided to remove all of the deck varnish and will re-caulk the whole thing.

I did some experimenting with varnish removal methods; two kinds of stripper and the heat gun.  The heat gun worked best on the interior varnish that wasn't in good shape, it comes right up with a putty knife (I'm using a window glaziers knife).    The heat was tougher on the newer deck varnish, so I'm trying the strippers; Jasco paint and epoxy stripper, and Citristrip.  Both of them remove the varnish,   Jasco much faster, but the Citristrip smells a lot better! Jury is still out on the winner there.  

None of the three methods for stripping are going to help me strip the interior under the foredeck, and my friend Larry from the club suggested, blasphemously, that I should consider removing the deck in order to access the interior to do it right.  I'm sure he's right, but it just sounds so painful.   Still considering that one; decision #1.

Cursed Screws
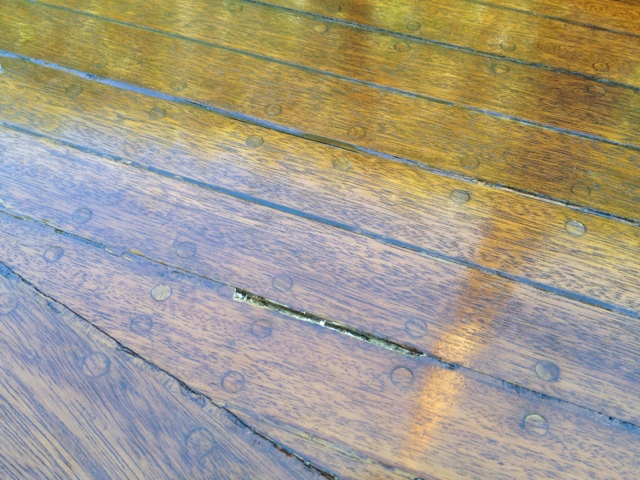
as you may recall from the previous photos, there are a bunch of darkened areas around the waterline.  John Rose,  Wooden Snipe Guru from Seattle, commented that the dark areas were from due to steel screw hull fasteners.

I pulled out a magnet to check John's assertion, and sure enough, they are steel.   Bummer.  The good news is that the decking screws are bronze silicon, and are all in great shape, despite about 20% of them having no bungs, only covered with caulk.   But should I completely refasten all the planks? i.e., even the fasteners that have not started to rust?  Ouch; Decision #2

If I do refasten, I've read that the best way to back out fasteners is with a brace and a screw bit, assuming any head remains.  Anybody know where to find the bit? I assume Ebay is one option, but anyplace sell new ones?  (I already have a brace)

John mentioned having to drill out the rusted screws, dowel the holes, and then refasten, but how does one drill out a rusty old screw without sliding off on side or the other and tearing out the wood (which may not matter if that rust has damaged it).

Oddly, despite the bronze screws in the deck, the deck trim around the gunwale was also fastened with steel screws... double bummer. But this may make decision #1 less painful to make, if I have to remove those deck planks anyway to refasten.   Decision #3

Oil Massage
One of the first things I stripped was the little outboard hatch at the stern.  I've been using it as a tester for tools and methods for stripping, reefing the seams, and testing some finish options. 
Here is the hatch, before oiling (apres oil pic to follow)
After stripping, most of the wood seems really dry, and I was worried about checking and cracking.  So on this tester I applied a mixture of Boiled Linseed oil and Tung oil.  I read that straight BLO can turn black in the sun, and that mixing 50/50 with tung oil would alleviate the problem.  The oil definitely helped the appearance of that little panel, but it also darkened it a bit.  Now this might have been a mistake, as I'm not sure if I can strip that off, or if it would need some intensive sanding.   That's an experiment for another day.  But it also will lead to Decision #4, should I use some type of oil treatment on the boat prior to varnishing, and will it be a problem if I leave boat bare (yet covered)during the stripping process?

To recap for those following at home:
  1. Remove the deck in order to strip and re-varnish under the foredeck?
  2. Refasten all the planks on the hull?
  3. Refasten all the Gunwale deck planks that are fastened with Steel?
  4. Oil the deck/hull prior to varnishing?  and if so, with what?
Decisions.. Decisions...

Thursday, October 18, 2012

This is going to get worse before it gets better

The immortal words of police chief Wiggum from the Simpson's definitely applies here.
"This is going to get worse before it gets better"
while the boat looked pretty good from a distance, there is a lot that has to be removed in order to restore it to sailable condition.

I've made good progress removing the fiberglass on the boat in order to assess its overall state and get it ready for repairs/refinishing.  I've been able to completely remove the fiberglass that was in between the cockpit ribs.  Most of it came out very easily using a combination of heat gun and scraper; the only areas that adhered well were over the caulk, in between the planks.  I can only guess that either the resin sticks to the caulk better than to the varnished wood, or that there was more resin in the voids between the planks that gave it more holding power.

Here is the area under the floorboards, minus the fiberglass.
I had the heat gun set at around 300C, and would use the scraper to get things started; once I could get my hands on a section, I would pull on it lightly while pointing the gun at the crease where the glass was separating from the wood.   In most cases, the glass was laid over varnish, so it came up easily.

The area on the left has been stripped,
but that on the right has not, and
you can see the bubbling of the varnish.


In areas that did not have glass, I've also been removing the paint and varnish. Throughout the boat, there is varnish that is bubbling up, some over paint, some on wood with paint on top.  The varnish comes off VERY easily with the heat gun; basically just heat an area until the scraper can start removing it, and then continue pushing the scraper with the heat gun an inch or two ahead.  it comes up like butter, but there is a lot of it. 

Here is a view up into the gunwale, you can see white paint, that have been half-heartedly covered with varnish, but not all the way into the recess.  All those little bubbles are in the varnish underneath;  not sure how to get to them... or if I want to.
View into the bow, you can see where the last of the fiberglass was removed, the white painted areas were never glassed;  not sure how I can ever get up there to strip anything, much less revarnish.
One challenge will be re-varnishing the interior.  specifically, do I need to strip and revarnish the underside of the deck? There are areas that are not easy to get to with the heat gun that are behind other scantlings within the hull.  Also, I have no idea how I'll be able to get this done in the bow.  It was all I could do to get under the deck in order to remove the glass and varnish under the deck at the front of the centerboard trunk, and there are several more stations forward of that, and the space gets progressively narrower.  For areas that are not visible (i.e., far up in the bow, and under the deck) do I just paint them rather than varnish?  Or for those areas that will be hard to strip and revarnish, am I better off just leaving it as is if the wood is not bare.  Many decisions to be made.

This is one of the rougher areas, the keel is not looking great
near the centerboard opening, definitely some rot here
I continued removing the the fiberglass from the exterior of the hull, using the same heat and pull method.  I've been able to get around the entire topsides and the transom,
along with some of the glass under the chine.  What I found was mostly good, although there are a few small, quarter-sized areas of rot, and many fasterners that have rusted and stained the wood.   Not sure if there is a way to bleach the dark wood surrounding the screws, where there is no rot, but I'll try.   As for the rot, I think the spots I've seen at this point can be chiseled out and a replacement piece scarfed in with epoxy.   I did, however, feel some potential rot in the keel at the opening for the centerboard, but that will have to wait until the boat is flipped and the remainder of the glass removed.

Here is a view of the starboard topsides, the glass can be
seen where it ends at the chine.  The upper plank has a
lot of checking, I'm assuming that this won't be a
problem, as I intend to oil the whole boat
before varnishing.

Before it can be flipped, the trailer will need to be modified to accomodate the boat upside down, and the remainder of the stripping be completed inside the hull.  I plan to do all the hull refinishing; the scarfing, caulking, sanding, varnishing and painting, before the boat goes right side up again, and I won't want to do any more stripping on the backside of that finished surface due to the risk of damaging the finished work.  My only other question on the stripping is should I also strip the varnish from the deck before flipping the boat?


I've started removing some of the varnish on the Deck to check the performance of different stripping methods.  Right now, heat gun is winning.  I'll need to rebung a lot of these screw heads that have been filled with putty.
I had a great surprise in my inbox yesterday evening, Cheryl, my benefactor in this endeavor, whose family had owned 1953 since the 50s, sent me a great picture of her, her brother, and her Dad with the boat in 1960. Now that looks like some seriously wholesome family fun.

Ernie Lommatsch and his kids c. 1960
I'm hoping to be ready to take the boat off the trailer and flip it before November, for those of you in the Los Angeles area, be ready for me to come knocking.  There's nowhere to hide.  Or I'll just use the lift at the yacht club... nah, too technical.

Wednesday, October 10, 2012

Pain in the Fiberglass

So I finally got things underway, after doing some research, talking to Pete the boat guy down the street, putting together a project plan (yes, I'm a nerd, at least according to my sister), and doing some "testing", I was ready to start the dirty work... but as you'll find as this blog progresses (hopefully) I can be pretty random when it comes to logical progression.  

The first thing I needed to do on the project plan was start pulling out the fiberglass on the interior of the boat, but I was dying to see what the planking looked like, so I decided to deviate a bit and start with topsides.   There was a section that had clearly come loose up on the bow near the chine, so I started there.

I cut a small slit and worked a putty knife in, added a little heat with the gun, and it started coming away from the hull like melted butter.  After getting a section separated from the chine to the rail, I started moving towards the stern, pulling it away in a single sheet as I went. 

OK, I went a little below the chine, but I wanted to see what the planks underwater looked like.  Who knows how this boat was stored in the 30s, might have been kept in the water.  And from the water stains, that might actually be true.  The good news is that any rot seems to be isolated around a few of the screw bungs.

some discoloration under the waterline, but very little rot at this point

As usual, I got a little impatient.  I started to pull the Fiberglass away using less and less heat gun, because it was coming off pretty easily.   Sure enough, one section pulled off the face of the plank (see below)  I'm hoping I can reglue or epoxy the wood that is stuck on the glass back into place to repair the damage. Moral of the story,  always use the heat gun, no matter how bad the adhesion


Just pulling the fiberglass off doesn't work, no matter how bad the adhesion.  This section tore away where the grain turned.
Luckily, I have the wood attached to the sheet of glass that came away, hoping I can epoxy, or glue, it back in place.
Here is the first good look at the mahogany planking.
further down the port side,  Looking good on the topside "Feeling good Lewis!"


My next random thought was to start taking off the fiberglass from the transom. Not sure why, just seemed like the fun thing to do.
The transom looks pretty good, there were some screw holes where the name used to be.
Here is the fiberglass off the transom, came off all in one piece
here i've made the turn around the port quarter,   things looking good down here too.


My final bit of randomness.  Here is the little outboard motor hatch from the sterm, I'm using it as a tester for caulk removal and finishing. Right now it has the caulk removed on the left side, and the whole thing has been stripped and wiped down with a 50/50 mix of linseed oil and tung oil.  I think I'm going to caulk the deck with window putty, which look like what they originally used.  the contrast of the mahogany and the white seams should be nice


Outboard motor "sample panel"
Until next time.  Remember, heat guns are your friends.

Tuesday, October 2, 2012

Detective work pays off

Robert, our newly elected (in my driveway) Fleet Captain for resurrected Snipe Fleet 24, found this picture of the boat in the 1938 Snipe yearbook.   What a sleuth!   I think I'd like to return the boat to this original configuration.

1953 in the 1938 Snipe yearbook

Sunday, September 23, 2012

Pictures: the starting point

Here are a few pictures of what we're starting with. The boat is solid with only a few spots of rot. The interior has been glassed and the resin is pulling away. There is also bubbling varnish inside. The mast has a possible rotted section above the shrouds. Hull was recently painted but will probably need to be stripped. We'll see; it should be an adventure.

First step. Get the trailer street ready with lights and bearing buddies. Then get a cover.


The deck looks great, but the caulking is cracking, will need to be redone.  I picked out the section in the center with my fingernail
The base of the mast shows where it was sticking out from under the cover,  dried out with no finish, but should be salvageable, the mast top is another story.  Did someone say spar varnish?
This is the good view, the glass issues on the inside of the hull covered by the floorboards.
One of the two mains, with a SCIRA measurers stamp from 1937
The Transom seems solid and has a little hatch to access the stem
One of the sailbags, the other one shredded when we picked it up
Here is the older sail, the same one with the measurers stamp.
From the bow,  you can see the home built trailer, and some of the issues with the deck.

Free to a good home

Yesterday, I picked up a boat from a lovely woman in Long Beach.  The boat, a Snipe, had been part of her family since the 1950s, when her father bought it from a coworker.  As we pulled off the makeshift cover, and blue plastic tarp bits sailed through the air, the smell of wooden boat was clear, but not the bad smell of rot, rather that smell of timeless craftsmanship.  For her, it was the smell of childhood.

Family lore was that the boat was built in 1948, but after some investigation, the sails revealed that it was Snipe #1953, and a measurer's stamp from August 1937 confirmed the vintage.

After lots of archeology and storytelling, we came to an agreement, this would be a "free to a good home" kind of transaction, and I would keep her up to date on the progress of my progress.  So that's what this blog will be, and interspersed, I'll try to tell some of the back stories as how we got there on a hot Saturday afternoon in Long Beach.